
Butchering Time
- Mar 19, 2021
- 5 min read
Updated: Jun 25, 2025
Butchering Time
If you have been blessed with having some land to have some livestock, then you may know that raising livestock can be rewarding, especially after butchering time. Being able to eat what you have put all your hard work into is a great thing. Raising and caring for your livestock not only enables you to control the type of feed you are feeding them, but also enables you to control unnessisary medications that are given in a more commercial operation. Butchering is what our topic is today.
Here around our homestead, it has been a busy couple of weeks. Started out by getting all of the butchering supplies out and cleaned. Things like knives, meat grinder, cutting boards, and an assortment of containers to put meat in (for in between the different processes). Things like butchering paper, prelabeled storage bags, freezer bags, and tape all had to be inventoried and ordered, if needed. Seasonings and cures, all had to be ordered too. All of the different areas that each process would be taking place in, had to be cleaned and prepped too.
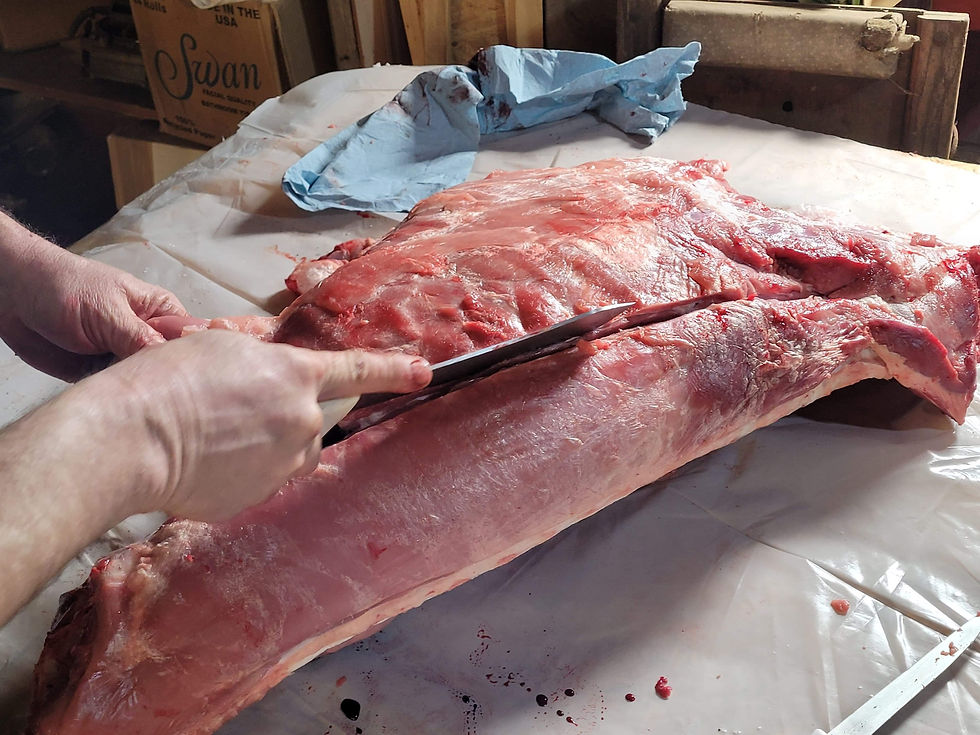
It was time to get to work. The first day of butchering we had to disbach, bleed out, disembowel, and skin the pigs out. Some people like to scald and scrape their pigs. These steps are important to get done as soon as possible to cool the carcass. This ensures harmful bacteria does not form and cooler meat is easier to cut. We let our meat cool overnight, hanging if possible. Timing our butchering in the cooler months is what we have to do because we do not have a walk in cooler or other means of cooling year around. These steps had to be repeated seven times on our first day, many hands made light work of this.

Day two. It was time to cut some meat! First we cut out the prime cuts of meat that we wanted, for example the back straps (for pork chops). Then we removed the inner tenderloins. This is one of our favorite cuts of pork. Next, it was time to get the rib and belly bacon removed and set aside for curing later. Out of the seven pigs, we only kept four nice hams, these were also set aside for curing. We use more sausage than anything else around here, so everything else on the carcass was cut up into chunks to get it prepared for the grinder.
Day three, It was time to grind all the pork chunks. We ran it through the grinder with our smallest cutting plate. Then it was time to mix the seasonings. In the past we did this by hand in various ways, with not good results. This butchering season, we picked up a meat mixer. It could only do 25- lbs. of sausage at a time, but it was well worth it. While ordering supplies, we needed a lot of sausage seasoning. We purchased several different types of seasoning by several different companies. We are definitely looking forward to trying them all, to see what we like and what we don’t. After mixing the seasoning in the mixer, with a splash of water, it was time to get it bagged up. Changing the cutting plate in the grinder and added a stuffing tube, we ran the sausage back through the grinder and into sausage bags. These bags are great at packaging the sausage into around 1.5 lbs packages. Definitely looking forward to all the recipes that Ms. Patty will come up with.
Time for some curing. There seems to be all kinds of recipes to cure hams and bacon. In the end, we chose to keep it simple. The hams we mixed up two parts sea salt to one part brown sugar which we rubbed into all the nooks and crannies of the hams. Storing in a cool dry place for a while, time will tell how they will turn out. Now for the bacon; I tried an expensive pre-packaged bacon cure, for a small sample. After some time we will have to cold smoke this bacon for its final step. The rest of the bacon, we are trying the old fashion method of salt curing. We just packed it into a container with a sea salt rub and packed all around it. Really simple process, we are all looking forward to trying this too. We may have to cold smoke a sample of this also. To wrap the weekend up we had to clean up all the mess and tools from this part of the adventure.

Next on the chopping block was a three year old heifer cow that was a little small framed for a good angus cow. We were out of steak and ground beef, so we really needed this and so the following weekend began. Day one. We did the same process of dispatching, bleeding, and skinning, cooling her in the shop overnight on some plastic sheeting. Usually, beef is let to hang for quite a few weeks to age. This process is for flavor and tenderness. We were unable to do this due to the weather and the lack of a walk in cooler.
Originally, we were going to harvest the best cuts of steak, then grind the rest for ground beef. Plans sometimes change, we did get the best cuts of steak. When we cut into some of the roast, we found some good looking cuts of meat (what we call poor man's steak). It was sliced up and packaged for anything Ms. Patty can think of. The rest of the meat was cut into strips for the grinder.
Day two it was time for making ground beef and packaging. The process was going to be like we did with the sausage; however, the seasoning did not have to be added. The first pass through the grinder made some really nice ground beef, but the second pass for packaging didn't go as planned. It turned the beef into a mush and really didn't make it into the package like it should have. This would mean a lot of hand packaging, for a whole lot of ground beef. We ended up heading to our local farm supply store to pick up a meat stuffing tool. This thing was awesome, even though it would only hold 5 lbs. of meat at a time. With this tool, packing took no time at all, then it was off to the freezer.
Everyone is exhausted at this point, but the work wasn’t done yet. It was time to clean everything up and prepare it for storage. After a good washing, the new meat mixer and meat stuffer needed a light spray down with some food grade silicone spray, to lubricate and protect it. We also had to gather, package, and organize all the tools and put them back where they belong in storage, which is no small chore.
Going back to the disenbowling of the cow, we were able to harvest a sizable amount of tallow. Tallow can be harvested from beef or mutton(sheep) fat; which is primarily found around the kidney area. The use of tallow is good in food preparation- as an ingredient and as cooking oil. It can also be used in soap, candles, healing salves and balms, as well as lubricant for wood, leather, and metalworking. Our process to make it after harvesting is to put the fat into a crockpot on low overnight to render it down. While still warm, pour it into its final container, filtering out the impurities with some cheese cloth. It will cool into a hard, smooth, white consistency that can be used at any time.

All this work would not have gone as well without a lot of help. The meat that was harvested not only went to feed our household, but some went to family and friends that helped and to a few families in need.
Thank you for reading my blog. If you have any questions or comments feel free to reach out. Be Blessed.
-Robert


Comments